I know I already wrote a post on meditating but I feel the need to follow up with a few other points. Let me start with the idea that the form of meditation that is right for you, is the one that works for you.
You see, for yoga teacher training, some of the required reading is Jivamukti Yoga by Sharon Gannon and David Life – the mama and papa of Jivamukti yoga! I’m in the midst of a chapter on meditation and I just really want to share some thoughts that are expressed in the book.
Sharon and David compare meditation to falling asleep. You can’t make yourself fall asleep – what you can do is perform all of those nightly rituals (getting cleaned up, putting on pajamas, lying in bed) to help facilitate falling asleep and then it just happens…maybe. In the same way, you cannot make yourself meditate – you can take steps to facilitate meditation (sitting comfortably, closing your eyes, concentrating on your breath) and then meditation just happens…maybe.
The cool thing is, when you can’t fall asleep, you don’t consider it a failure. The next night you repeat all your nightly rituals and try it again. This is how meditation should be approached. You haven’t “failed” if you don’t achieve uninterrupted concentration and connection to the “True Self”. You just have to keep practicing!
So let’s talk about the ways you can facilitate a meditative state, those “nightly rituals” you can perform to ultimately help you fall asleep. First…sitting. {I’m feeling lazy…click on the pictures for sources}
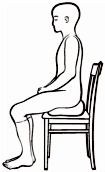
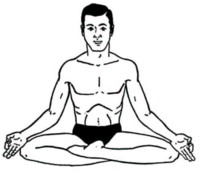
Choose a seated position that is comfortable for you in which the spine is perpendicular to the earth:
1. Sit in a chair. One that is not too soft and has a straight back. Find a chair that you can set your feet flat on the floor, or put a box underneath your feet. Your legs should be parallel to each other and your hand can rest in your lap or on top of your thighs.
2. Sit cross legged. Place a folded blanket or cushion underneath your butt so that your hips are higher than, or even with, your knees. You can even place the knees on top of blankets or cushions so they get some support – let them feel like they can just drop into the blankets. If you want to, lean against a wall for support.
3. Supported Virasana (hero’s pose). Kneel on both knees so that the tops of the feet rest on the floor and the inside edges of the feet rest against the thighs. Place a folded blanket or cushion underneath your butt, so that you are lifted as high as necessary for your knees to feel comfortable.
4. Vajrasana (thunderbolt pose). Kneel back and sit on the inside of your feet with your heels on the outside of your butt. Let the big toes touch, putting the right big toe on top of the left.
5. Half lotus. Sit cross legged and place the right foot on top of the left thigh with the soles of your feet turned upward. Sit on a blanket or cushion to let your knees drop closer to the floor.
6. Siddhasana. Sit so your left heel presses against your pelvis (or close to it), tucking your toes between your calf and the right thigh. Place the right heel on top of the left heel and tuck the right toes between the calf and thigh of the left leg.
7. Lotus Pose. Place your right foot on top of the left thigh, as close to your pelvis as possible then place the left foot and place it on top of the right thigh as close to the pelvis as possible.
Now…hand positions.
1. Hands resting on the thighs, palms up or down. Relax your fingers and allow them to fall slightly apart from each other. Shoulders should be open and relaxed.
2. Chin mudra. Join the tip of the thumb with the tip of the index finger. Let the other three fingers separate. Palms up or down.
3. Bhairavi mudra. Place hands in our lap, palms facing up.
So, now you can go forth and make your self comfortable and allow your meditative state to set in!
On a related note, this weekend is my first YTT session and I am so NERVCITED! I think I’m going to meditate on it a bit…


