Friday, April 29, 2011

The Friday Five

Not only have I been struggling coming up with quality blog posts (which is weird, I haven't experienced writer's block since I had to actually do some creative writing...in high school) but it's been a pretty emotional week for me. I'm working on a new life plan, which I'll share with you sometime soon, I promise. 

In the meantime, let's keep busy with a little link love! Here are a few notable links for the day that I hope you'll find as useful/interesting/fun as I did!

I think I'm going to make these homemade tea bags for my mom and eventually-mother-in-law for Mother's Day (photo credit: Easy Peasy Organic)


I was completely shocked by some of the statistics that Katie reported from the clinic she went to on childhood obesity. Really looking forward to her next post about this! (photo credit: Healthy Heddleston)

Katy has some really great advice on blogrolls...and let's get real, I could use all the great blogging advice I can get!


“Everything can be taken from a man or a woman but one thing: the last of human freedoms to choose one’s attitude in any given set of circumstances, to choose one’s own way.”
~Viktor E. Frankl, Man’s Search for Meaning
(quote courtesty of Reading For Your Success)
Scott's post on how to enjoy a job you hate is hugely relevent to my life right now. Thankfully, I'm taking some of the steps he suggests to work on making it better.
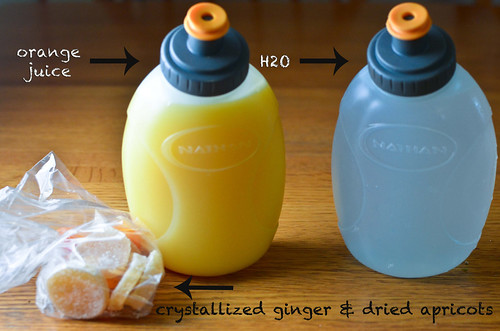

Here's a great post on  marathon nutrition...even though Sarah posted this a while ago, I still find it a great resource for what to eat before, during and after edurance workouts (photo credit: Daily Nibbles)


What are some of your favorite links from the past week?

Peace, Love & Bagels,


Wednesday, April 27, 2011

Wineday Wednesday + a Tabouli Recipe

Ok, unfortunately, I have no wine reviews for you today, just a recipe.

I simply wanted to take this time to recap my alcohol/sweets hiatus during Lent and tell you about where I'm taking it from here.

In all honesty, I stopped "giving up" alcohol and sweets for Lent about a week and a half early. I didn't make the decision because I wanted to get toasty at a family wedding, or at the Easter dinner that was on Saturday instead of Sunday. I did it because I felt that I found what I wanted in giving it all up in the first place.

I didn't think restricting any more was necessary. I've always used Lent as a way to take a step back from my habits and learn that I can live without them. In the words of Dan Millman (from The Way of the Peaceful Warrior); “Habit is the problem. All you need to do is be conscious about your choices and be responsible for your actions.” 


Well, there way a day a few weeks ago where I thought 'gee, I just want a cookie right now...why I am not allowing myself to have one?' Overindulging was my habit but I felt like I had it pretty much under control before Lent was over. 


Oh, and something else that really struck me when I was reading The Peaceful Warrior...spontaneity. So, hell. I ate a damn cookie.


And then I had a beer. (by the by, let me take this moment to apologize to anyone who finds it annoying that I began a sentence with "and")


So, where I'm at now? We've been [trying desperately] to brew our own beer. I am also making my own cookies. I'm enjoying a dessert every now and again. I enjoy a beer or a glass of wine every so often. Sometimes I feel like it, sometimes I don't. I am intentional about my choices and responsible for my actions.

Ok, gee whiz.

Time for that recipe!


millet tabouli

serves 4-6
prep time: 10 minutes
cook time: 20 minutes

ingredients:
  • 1 cup millet
  • 1 can chickpeas
  • 1 cup chopped parsley (any type)
  • 1 small onion, diced
  • 4 garlic cloves, minced
  • ½ cup sun-dried tomatoes, chopped
  • ¼ cup lemon juice
  • 2 tbsp olive oil
  • salt, pepper and oregano to taste

directions:
  • Put 1 cup of millet and 2 cups of water in a saucepan and bring to a boil. Once it is boiling, reduce to a simmer, cover and let cook for 15-20 minutes (or until all the water has been absorbed by the millet)
  • When millet is done cooking, mix with all other ingredients in medium sized mixing bowl. Season with salt, pepper and oregano to taste

How did lent go for you? What did you learn from it?

    Peace, Love & Bagels,

    Tuesday, April 26, 2011

    Sedentary.

    This story on NPR was alarming to me.

    I don't consider myself to live a sedentary lifestyle, but apparently if you sit at a desk all day (I do), you may as well be.  I mean, I get it.

    Though I would love nothing more, most of my day is not spent up and about. I sit.

    and sit.

    and sit some more.

    I make a very concerted effort to live my life in an intentionally healthful way that will [hopefully] work against me ending up with any chronic diseases. If I do, that's simply what was in the cards for me...but I can at least give it my best effort right?

    After hearing that story, I feel even more suffocated by the time I spend in my office.

    I guess this post is just to remind myself, that I make decisions, each day, to make my life here at my desk more bearable, more healthy, more mindful. Here are five things I do to avoid a completely sedentary work-style...


    1. Sit on an exercise ball, instead of a chair. Ok, so I'm not totally convinced of the benefits of this, and I've heard it might not even be very good for you. Regardless, it's made me more comfortable than sitting in a chair all day, and that is what's most important to me. When I first started work, I would get back pain since I wasn't used to sitting in a chair all day long. The exercise ball has definitely helped that! 
    2. Walk a lap around the office every hour. I set an alarm on my computer (for you Google Chrome users, "Cool Clock" is a perfect extension for this) to go off every hour, which reminds me to get up and take a lap. Or do 10 push-ups. Or do a sun salutation. Whatever it is, it reminds me to do a micro workout and stay a teensy-weensy bit more active. 
    3. Drink lots of water, so I have to pee often. TMI? Don't care. This also forces me away from my desk.
    4. Take advantage of my lunch hour for a quick workout. I have been practicing a bit of lunchtime yoga (in the 3' x 6' box that is our shower room) to get my heart pumping a bit. I started it so I have time to fit in a little cross-training into my marathon training schedule, but I think I'm going to continue either lunchtime yoga practices or short runs, just to get my heart pumping in the middle of all the sitting I do. 
    5. Print at the printer that is on the other side of the office. This gives me another chance to move away from my desk, but it's also a good way to see other people on the way to the printer and socialize a little bit. It breaks up the monotony of my stare-at-a-computer-all-day work. Not gonna lie though, sometimes I get lazy and print to the printer that's 10 feet from my desk. You can't win 'em all!
    Those are just a few of my thoughts to get moving more often. Since running several times a week isn't going to negate all the negative things that sitting for 8 hours straight can do to me, I just need to get away from my desk more often!

    Now, I want to hear from you...What do you do to get out of your chair and move around a little while you're at work?

    Peace, Love & Bagels,


    Monday, April 25, 2011

    Cleveland 10 Miler Race Recap + Training Week #16


    With the finish of the Cleveland Ten Miler, we officially have 3 weeks to go until marathon day!

    I was really thrilled with the 10-mile race on Saturday. I didn't PR, but we definitely enjoyed the flat, easy course and happily took the opportunity to get a little change of scenery and run with others. I love how running affords me the chance to explore new neighborhoods that I probably wouldn't have gotten the chance to explore otherwise.

    The theme of the race for Brandon and I was: you know you have to do laundry when you run a 10 mile race in argyle socks (for the record, that was Brandon...not me :)) Whoops! Having a new puppy in the house and training for a marathon left us precious little time to do any laundry in the past few weeks. 

    Our plan for this race was to extend our run/walk training from 4 minutes of running, 1 minute of walking to 2 miles of running, 1 minute of walking. We haven't really decided how we're going to do it for the marathon, but for this 10 miler, we ran in between water stopped and took a walk break while we were enjoying a bit of hydration. Unfortunately, right around mile 6, I got a side cramp that made it difficult to breathe and run at the same time (normally, an essential part of running). So the walk break at mile 6 was a must! Then, the cramp came back to haunt me just after our mile 8 walk break and I had to walk for several minutes to let the feeling pass. I hate side cramps. There is never a comfortable way to run though them...I always have to stop an walk! Regardless, we finished strong...only two minutes slower than my last ten mile finish! I'll take that. It was a (thankfully) dry and warm race. So I couldn't have asked for anything better. Plus, I pooped twice before leaving that house that morning, so I wasn't in any danger of any mid-race tummy rumblings. I was also pleasantly surprised to see my name on my race bib! There is nothing better than spectators calling you out by name, it's so motivating for me!

    Our finishing time was 1:36:49, which is about a 9:46/mile.

    We pretty much didn't do any running besides that race last week. Monday was an easy 3-mile day and then between traveling to Virgina, bad weather (er, I should say Cleveland weather) and Brandon not feeling at the top of his game...taking a VERY easy week was definitely in the cards. This week is the last week of big runs for us, so we're gonna nail them, along with some much needed yoga, and then ease into our two week taper! 


    This week I really want to focus on bringing cross training back into the mix. Yoga is at the top of my list and getting out on the bikes are up there too, if the weather becomes a bit drier.

    I just read something on Twitter that I'd like to try - do 100 push-ups every day this week by doing 10 pushups every hour for 10 hours in a row. Think I can do that? I do!

    Who else ran the Cleveland Ten Miler and how did everyone do? 


    Peace, Love & Bagels,
    Friday, April 22, 2011

    Campsite Breakfast Wraps

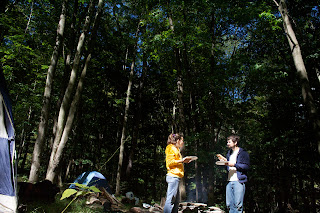
    I was perusing my pictures from a camping trip in Ripley, NY last year and I came across a sweet picture of breakfast that we made one day:


    To give credit where credit is due; all of the pictures in this post were taken by the one and only Mr. Alex Kocher (Brandon's little "twin" brother) and if you have a chance you should definitely, definitely check out his work! He is pretty amazing. 

    Anyway, back to breakfast! We made deliciously nutritious breakfast wraps...and not just any deliciously nutritious breakfast wraps, we made classically overstuffed, open-fire toasted deliciously nutritious breakfast wraps! Along with some fire brewed peach tea, it's the perfect way to wake up in the middle of nature. Pure, unadulterated nature.


    We spent most of our time basking in the sun, doing a bit of exploring and just taking in all the life that was around us. Oh, and eating...of course.

    We eat like kings and queens when we go camping.


    breakfast wrap
    serves 1
    prep time: 5 minutes
    cook time: 10 minutes

    ingredients: 
    • 1 whole wheat wrap
    • olive oil
    • cinnamon
    • 2 tbsp almond butter
    • 1 tbsp mung bean sprouts
    • 1/2 banana, sliced
    • 3 strawberries, sliced
    • 1/3 peace, cut into thin wedges
    • 2 tbsp granola
    • 1 tbsp raw honey
    directions:
    oil the outside of the wrap and sprinkle with cinnamon, then flip over to fill.
    spread almond butter on open wrap.
    lay all sliced fruit on top of almond butter.
    sprinkle with mung bean sprouts, granola and honey.
    close wrap and place in pre-heated oven or over a campfire (on top of a grate).
    cook for about 10 minutes until brown and toasted on the outside and warmed through.

    What is your favorite camping food?


    Peace, Love & Bagels,


    Thursday, April 21, 2011

    Anatomy of a Training Run: Fueling for Long Runs

    Don't take this post as "the best way to fuel during a long run". It's definitely not. Take it at face value; it's a list of all the things I've stumbled upon for long run fueling and what I've found is best for me, based on my experiences. The best long run fuel for you might be completely different, so my overall message is please listen to your body, experiment during training and most of all, don't change anything up on race day!


    photo credit: http://guenergy.com

    When I was training for my first half marathon, GU was my fuel of choice. Espresso Love was my favorite flavor, because it had extra caffeine in it...which has a good reputation when it comes to distance running. The only place I could figure out where to keep it was in my sports bra, which worked out pretty nicely most of the time. I would take one pack with me and that would easily get me through 13.1 miles, because I'd only eat half at a time.

    The problem with GU came when I was training for my first marathon. I had to bring more with me, so my sports bra was no longer a good place to keep it. I started to pin a few to my shorts, but sometimes that wouldn't work because the packs would rip through the pins and fall off (no good, since they're not exactly cheap).

    My final straw with GU came during that first marathon though. They had GU stations every so often, so I decided to just take what they had...the flavors were vanilla and chocolate...two flavors I wasn't used to. By the time I went through the last GU station, I thought I was going to hurl because the flavor, volume of GU consumed and the consistency finally got to me. Not only that, but since I've started to mindfully eat more whole foods and limit the amount of processed foods and unpronounceable ingredients that I put into my body, GU doesn't exactly fall into the "whole foods" category:


    So that was enough of that. 

    photo credit: http://media.rei.com

    Then I tried a few different sports drinks, Cytomax, Accelerade, a bunch of other things that I don't even remember, but wanted to try. I don't like sports drinks. Give me good 'ol water any day. There's something about these drinks that just never sit well with me - so I ended up giving them all up pretty quickly. Plus, they're also not cheap!

    Ok, so it's at about this point in my life when I start realizing that I don't want to refuel with a bunch of processed energy supplements. I could easily spend less money and get the benefits of whole, unprocessed foods in my system by just doing a bit of research.  

    photo credit: http://www.fcps.edu


    I started with a classic: raisins. They are absolutely great for fueling on long runs! Also, the tastiest raisin you'll ever taste is the one you eat while you're exercising. My problem with this was that I don't buy raisins often enough to bring them on my runs on a weekly basis. Also, they can be pretty sticky. Sometimes I felt like I needed to eat more that I could to keep myself going too. Oh, and keeping them in my sports bra was always touch and go...they do take up a little more space than GU packs. 

    I have tried GU, various sports drinks, candy, raisins, nuts...basically I've been there and back trying to find the best method for me to fuel during my long runs. Well, I've finally found a few things that I can't live without during my endurance workouts: energy bites and maple syrup water

    photo credit: http://images.ohsheglows.com

    As you know, I discovered a new love for my Camel Bak but one of the biggest pro's of the Camel Bak is all the storage space for other things you might need on your run: food, an ID, phone, etc. I like to keep my energy bites and another small water bottle full of maple syrup water in my Camel Bak. 

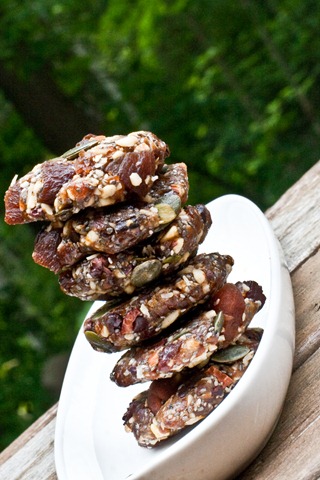
    The energy bites are an Oh She Glows original recipe that I stumbled upon one day and haven't looked back since the first time I made them. You can find that recipe here. They are nutritionally stacked and one bite will easily fuel me through the toughest miles of my run. Plus, they're sweet and delicious; dates, almonds, sunflower seeds, the works. They're also really great for traveling, because they are small and store well.

    I read something somewhere about making your own sports drink my mixing maple syrup into water. That was probably the happiest day of my life! I was brought up on real Vermont maple syrup and it is one of my favorite sweeteners. A diluted version of it is just as delicious. And it makes sense! Sugar + water = a blast of carbs that quickly goes straight to where you need it, without taking the time to get your stomach working to digest it. 

    So that's the way I've been fueling for long runs during my training for the Cleveland Marathon, and it will be no different on race day. I'll come equipped with my energy bites and a bottle of maple syrup water! 

    How do you fuel up for long runs?

    Happy fueling!

    Wednesday, April 20, 2011

    Balsamic Butternut Squash Pasta

    So, here's another lazy Sunday recipe of mine. It's loosely based on a recipe that one of my colleagues was uber excited to share with me because his "old lady" made him this "killer pasta, with some kind of squash in it." They used a very specific kind of cheese, grana padano, which he said absolutely made the dish.

    I obviously didn't use aforementioned cheese. That would have been way too much work. I just stuck to good ol' parmesan.

    The kicker in this dish is the mix of maple syrup and balsamic. I love the way the tarty balsamic cooks down to a sweetness that is wholly complemented by the subtle undertone of maple. 

    Love me some maple! I hope you like this as much as we did!


    balsamic butternut squash pasta

    adapted from Cuisine At Home Magazine


    Serves 4
    Prep Time: 15 minutes
    Cook Time: 30 minutes

    ingredients:
    ⅔ package of pasta - any type
    1 butternut squash, cubed
    ½ cup broccoli, stalk included, chopped
    2 cloves garlic, diced
    2 tbsp balsamic vinegar
    1 tbsp maple syrup
    2 tbsp olive oil
    salt + pepper
    parmesan cheese to garnish

    directions:
    Preheat the oven to 450 degrees (F). Toss the squash with the vinegar, oil, salt and pepper and spread out on a baking sheet. Pop the sheet in the oven for 15-20 minutes (until the squash is tender) mixing it halfway through cooking. Remove and set aside when it’s finished cooking.

    While the squash is cooking, boil water and cook the pasta according to the package directions. Drain and rinse, but reserve about ½ a cup of the pasta water.

    In a  skillet on med-high heat, saute the garlic until browned, then add the broccoli and cook until tender. Add the squash and pasta as well as the pasta water and cook through. Turn off the heat and mix in the maple syrup and a splash more of balsamic vinegar.

    Serve garnished with parmesan cheese.


    What is the strangest mix of flavors you have ever used in a recipe that just blew you away?

    Peace, Love & Bagels,

    Tuesday, April 19, 2011

    Breakfast Frittata

    Today has been a whirlwind day. I got up at approximately 3 a.m. to catch a flight to Roanoke, VA via Atlanta. I spent all day at the hospital here, saw two surgeries and one of my newest implants used.

    The picture below is a lapidus procedure:


    But that is neither here nor there. I want to share with you a recipe! I got to spend a lot of time this Sunday making loads of delicious meals! My favorite thing about the weekends is being able to slowly get up and take time to make a good and hearty breakfast. 

    Usually with eggs.

    Saturday was a wash - we got up and pretty much got in the car right away to head to Pittsburgh for a wedding. Sunday was glorious though! The perfect day to pull out the cast iron skillet and put lots of love into a breakfast for Brandon and I. 

    This fittata is super easy and you can use any veggies that you have around. Don't skimp on the veggies either, I like my frittatas really veggie-heavy! It gives you a nutritionally packed breakfast that kept us satiated through a few hours of pulling up weeds in our garden!


    breakfast frittata

    Serves 3

    Prep time: 5 minutes
    Cook time: 25 minutes

    ingredients:
    1 cup arugula, chopped
    1 cup broccoli, chopped...don’t toss the stalk, use it too!
    ¼ of a cucumber, diced
    2 carrots, sliced
    5 eggs, beaten
    ½ cup gouda (grassfed, organic and local if possible!) grated
    olive oil, salt + pepper
    herbs + seasonings

    directions:
    Preheat oven to 350 degrees (F). Chop, cut, dice or slice all the veggies...keep in mind that you can really include any veggies here, the ones that are named in the ingredients are the ones that I had on hand.

    Oil an oven safe skillet and saute the veggies, starting with the most hearty ones, for a few minutes, until they are just tender. While the veggies are sauteing, season with some garlic powder and onion powder (or whatever else you want to season the veggies with).

    Turn the heat off under the veggies and beat the eggs together in a bowl. Pour the eggs over the sauteed veggies and mix through, so the eggs spread out evenly in the skillet.

    Place skillet in the oven for 15-20 minutes, until the eggs set and are cooked though. For the last 3 minutes, sprinkle on the cheese so it becomes melty and delicious.

    Remove from oven, slice like a pizza and serve.


    What is your favorite Sunday breakfast?

    Peace, Love & Bagels,

    Monday, April 18, 2011

    Marathon Monday: Training Week #15

    Ahhhh.

    That is the sound of me sighing, because the past week was a beautiful and easy running week for us!

    Monday - rest
    Tuesday - 6 mi easy. I took Pele' out for the second half of this run to give him a little lovin' after bringing home the new puppy and we stopped by Ben & Jerry's to see Brandon while he was muscling through his personal hell: Free Cone Day.
    Wednesday - a mile-long walk with the puppies.
    Thursday - 6 mi easy. 
    Friday - 7 mi easy.
    Saturday/Sunday - rest.

    Our training was, more or less, uneventful last week because it was a much needed easy week and we had a lot of work to do around the house...getting Buck used to our home and our rules, tending to our garden and our herbs, a wedding to go to on Saturday, etc., etc., etc.,

    Last week was the week to get the exhaustion out. I didn't even bother cross-training much. I needed the rest. This week, it's back to lunchtime yoga practices and  

    This week, is a little less "rest-y" but we're foregoing a 20-miler for a 10 mile race this weekend. I'm totally okay with that. Save the 20 miler for a weekend when we don't have to spend that evening partying with the family for Easter!


    Today is the start of Passover, but since I'm traveling to Roanoke for work (and missing the OBA April Meetup AND Emily's Passover seder) I won't be having a seder until Thursday or Friday. I was so excited to have my own seder for Brandon and I this evening...but running, packing and going to bed is going to have to take precedence.

    Peace, Love & Bagels,

    p.s. Housekeeping note: for those of you who subscribe to the PL&B feed by email (or potentially even a feed reader??) I had to update my feed due to the domain name change. I'm working on trying to get it to switch so you can still get updates on posts...but if you're not receiving them, please re-sign up using the "subscribe by email" in the right sidebar!! Sorry for all this weirdness! 

    Friday, April 15, 2011

    Homemade Bagels

    This post is a long time coming, especially considering the name of this blog.

    [Actually, let me give you a little backstory on the name Peace, Love & Bagels. I had put a lot of thought and research into making bagels at home and one day I said to Brandon, "I want to make bagels!" Well, we all know that boys tend to have selective hearing (love you Brandon!) you know what he heard?? "I want to make babies!" Oh lord! It became an inside joke with the two of us and sometimes when we talk about bagels, we say "babies" instead!]

    Now, that I've told you that story, the title of this post could totally be taken the wrong way. I'm going to show you how to make real bagels...you know, the kind made of whole grain goodness that you eat with a schmear of cream cheese or peanut butter! Get your mind out of the gutter!!

    Back to business; bread is one of those things that I'd much rather make than buy. There are so many additives and preservatives in store bought bread, when really all it takes is four simple ingredients for a simple, basic loaf of bread....
    1. flour
    2. yeast
    3. salt
    4. water
    That's basically what is in these lovely little gems...yeast, water, flour, salt and a bit of sugar. Oh, and of course, whatever you want to top them with. We chose everything bagels for our first bagel endeavor; salt, poppyseeds, onion powder, garlic powder, sesame seeds, etc

    Homemade Bagels
    makes 10 regular sized bagels

    ingredients: 
    • ¾ teaspoon active dry yeast
    • 1 ⅔ cups warm water
    • 2 tablespoons sugar
    • 1 tablespoon molasses
    • 4-1/2 cups whole wheat flour (you can use any mix of flours to equal that amount)
    • 1 ½ tablespoons table salt
    • poppy seeds, salt, sunflower seeds...anything you want to top your bagels with
    directions:
    Whisk together yeast and water and let stand for 5 minutes until it gets foamy.

    Either with a wooden spoon or a mixer (with dough hooks) on low speed, mix in the flour, sugar, molasses and salt.

    Knead for about a minute, until you get a slightly sticky, but not tacky, dough. Add more flour or water if necessary (1 tablespoon at a time), depending on the consistency of your dough.


    Knead for 5 more minutes then transfer your dough to an oiled bowl and cover with plastic wrap. Let it rise in a warm place for 2 hours (I left mine for more because I was out and about doing errands - it was no biggie).


    Divide the dough into 10 pieces, making them as equally sized as possible, then cover with a damp towel to let them rest for 20 minutes. 

    Line two baking sheets with parchment.

    Take a piece of your dough and roll it into a rope about 6 inches long. Form a circle around your hand and press the two ends together.

    Place the bagels two inches apart on the baking sheets, then cover and let rest for 20 more minutes or until they are puffed.

    Now...

    Preheat the oven to 500 degrees (F).

    Fill a large pot with water and bring it to a boil.

    Gently drop a few bagels into the boiling water (as many as can comfortably fit without touching each other). After 30 seconds, use a slotted spoon to flip the bagels over and let them boil away for another 30 seconds. 

    Use your slotted spoon to turn out the bagels onto the baking sheets that are covered in partchment. Working quickly, top with poppy seeds, salt, etc. (or whatever you decided on) while the bagels are still wet so that the toppings stick.

    When all bagels have been boiled and topped, pop the baking sheets in the oven and bake for 5 minutes. Rotate the sheets and drop the temperature down to 350 degrees (F) then continue baking until they are golden brown (8-10 minutes). 

    Using a spatula, flip the bagels over and bake for another 5 minutes, or until their backsides are also golden brown. Transfer to a wire rack to cool.


    Happy Bagel Eating!!

    Thursday, April 14, 2011

    A New Look for PL&B

    I have a confession to make...

    I couldn't make the switch to Wordpress.

    I did sign up and try out a few things, but I came to the conclusion that I can get what I want out of blogger and I didn't want to lose all my links and potentially some readers by making the switch.

    In the end, I designed a new header (thank you fotoflexer.com) and revamped a couple of things. It's not perfect, but it's all mine and I love it!

    Oh, and one more thing... Peace, Love & Bagels can now be found at https://peacelovebagels.com!!! I am officially free of that silly .blogspot suffix! Peace, Love & Bagels is growing up!!

    (I'm not sure if my commenting program is working properly yet, so please feel free to leave a comment and test it out!)


    Tell me, what do you think of the new look? Any suggestions/constructive criticism? Am I a complete doof for not being able to switch to Wordpress?

    Daring Cooks: An Edible Container

    I saw this challenge and an idea immediately struck me...duh, breadbowl!!


    This month's daring cooks challenge was brought to us by Renata of  Testado, Provado & Aprovado! and the challenge was to make a savory edible container and fill it with something appropriate. 

    There were a lot of good ideas given to us (like a noodle basket, or a pumpkin bowl), but all I could think about was soup...in a bread bowl.

    Fricken' YUM!

    I wasn't sure if my No-Knead Bread recipe was going to work for the bread bowls, but as it turns out...it works beautifully! I didn't make it a rosemary lemon bread, instead it was rye bread with rye berries in it. It was a winner! 

    This recipe is basically my bread recipe, made into two loaves instead of one so the bread bowl is very hearty. I had the leftovers for lunch the next day and it took me an hour and a half to finish eating the whole thing. Though, now that I'm typing this, I wish I had a bread bowl to eat...I must be hungry!


    Vegetable Stew in a Bread Bowl
    [serves 2]

    for the bread bowl:
    • 3 cups whole wheat flour
    • 1 ½ tsp salt
    • ½ tsp active dry yeast
    • 1 ½ cup water

    for the stew:
    • 3-4 cups veggie stock
    • 1 head broccoli
    • 1 cup lima beans
    • 1 cup corn
    • ¼ head cabbage
    • ½ cup mushrooms
    • 1 dried habanero pepper (optional)
    • 2 tsp oregano
    • salt and pepper (to taste)
    • basically any other veggies and spice you have lying around and want to include
    • parmesan cheese (for garnish)


    the night before:
    1. mix all ingredients for the bread bowl in a large mixing bowl (it will become a shaggy dough)
    2. cover bowl with plastic wrap and leave in a warm place overnight
    3. mix all veggies and spices together and put in a crock pot
    4. cover veggies with broth and give it a good mix
    5. turn the crock pot on low and leave to stew overnight


    the day you want to eat your stew:
    1. turn out your dough onto a floured cutting board
    2. separate into two equal pieces and shape into loaves
    3. cover with a clean towel and let rest while doing the following...
    4. you are going to use a cast iron pot or dutch oven or other oven safe pot (with a lid) to make your bread.
    5. preheat oven to 400 degrees with cast iron pot inside, let the cast iron heat up for about half an hour
    6. when the pot is heated, take it out of the oven and gently plop your loaves into it
    7. cover and place into oven for 30 minutes
    8. remove the lid and continue baking for another 15 minutes
    9. remove loafs from oven and let cool for about half an hour (I couldn’t wait that long, I was hungry!)
    10. cut a hole into your bread bowl with a sharp knife so that it holds the stew
    11. fill the hole with stew and enjoy stew garnished with parmesan cheese
    So, my lovely PL&B readers, what edible container would you have made??

    Peace, Love & Bagels,


    Newer Posts Older Posts Home