Tuesday, November 30, 2010

Aunt Mo's Sweet Potato Pie


I hope you're prepared for the delicious that is my Aunt Monique's sweet potato pie. I finally got the recipe from her and tried it for myself last year. Aaaaaabsolutely a winner! My aunt normally serves this pie with dinner for a sweet change of pace, but I prefer it to your run-of-the-mill pumpkin pie for dessert.

This year I was inspired (once again!) by the neverhomemakers and made what would have been two big sweet potato pies into 12 mini-pies, one regular pie and a pyrex bowl filled with the leftover filling (pie filling eaten in the form of custard is my new favorite dessert). I brought the regular pie, along with Pumpkin-Poppy-Sunflower Seed No Knead Bread and Mama Stamburg's Cranberry Relish (as "seen" on NPR) to Brandon's family's in PA and the mini-pies were for Thanksgiving #2 in North Carolina with his sister.


It's definitely NOT one of my healthier recipes, but it's SO worth it for a holiday indulgence! If you're hell bent on healthify-ing it though, you can probably do so with some easy substitutions, like applesauce instead of butter, fat free evaporated milk (or perhaps even just skim?), egg whites instead of eggs. You could probably reduce the amount of sugar or sub in something a bit less processed, like agave, or even leave it out altogether depending on how sweet you like it. My suggestion? Try this recipe totally unadulterated before making healthy substitutions.


Aunt Mo's Sweet Potato Pie


Ingredients:

2- store bought 8" pie pastries (I used a double recipes of Ashley's Chocolate Kissed Crust)
1-1/2 cups of sugar
3 eggs
1-1/2 cup mashed sweet potato or yams
1 tsp. vanilla
1 stick of butter
1 small can evaporated milk. (2/3 cup)


Directions:

Preheat oven to 350. Cream eggs and sugar. Add sweet potato, vanilla and melted butter. Last, add milk. Mix well. Put in unbaked pie shell. Bake for 1 hour at 350...but if you're baking mini pies, start with half an hour and go from there. The filling will be set and slightly brown on top when it's finished (I left mine in for 45 minutes and they turned out a bit burnt!)


What's your favorite holiday recipe??

Almond Raspberry Cupcakes, take 1.


This is my first Peace, Love & Bagels original recipe! I was inspired by the Almond Berry Cupcakes from Main Street Cupcakes and I wanted to try to make my own as a Chrismukkah surprise for Brandon's sister (Almond Berry is her favorite MSC cupcake). 

This was my trial attempt so I could get it just right for Tanja...they taste nothing like the MSC cupcakes but the flavor turned out pretty amazing! I'm going to call this a win for my first attempt at building my own recipe. I'm planning on changing a few things the next time around so I'll repost the recipe when that happens. Some changes I'd like to make:
  • bake the raspberry sauce into the cupcake instead of piping in the filling
  • leave some whole(ish) almonds in the batter
  • thicker frosting, so I can use my piping things to make the cupcakes look a little bit more enticing...my frosting was VERY sweet, but I think the best way to thicken it up is more powdered sugar. I'm all for the sugar high
  • I  might also add a bit of sweet (sugar, agave, juice, whatevs..) to the raspberry sauce
  • Use some unbleached AP flour in the batter
The frosting was my biggest let down...but that was highly my own fault because I didn't even follow my own recipe. I probably only used 2 cups of powdered sugar, instead of my prescribed 4 cups. Holy laziness. Also, I really REALLY liked the raspberry and wanted there to be more of it, I think I will drizzle any leftover raspberry sauce on top after they're frosted. Without further ado...

Almond Raspberry Cupcakes
almond cupcakes filled with raspberry sauce and topped with almond frosting
makes 12 cupcakes

for cupcakes:
1 ½ cups whole wheat pastry flour (can sub all purpose or regular whole wheat or a mixture)
½ cup almond meal**
1 ½ tsp baking soda
½ cup sugar
2 egg whites
½ cup applesauce (or sub butter or margarine)
½ cup almond milk
½ tsp vanilla
½ tsp almond extract

for raspberry sauce:
1 pint fresh raspberries
½ cup water or choice of juice (or ¼ cup agave and ¼ cup juice/water)
2 tbsp cornstarch mixed with enough water to form a paste
½ tsp vanilla

for almond frosting:
⅔ cup unsalted butter or margarine
4 cups powdered sugar
¼ cup almond milk
1 tsp almond extract

In a small saucepan, combine the raspberries, agave nectar, and juice. Bring to a boil over medium-high heat. When it boils, stir in the vanilla and the cornstarch mixture. Continue to stir as the mixture boils and thickens. Remove from heat and set aside.

Preheat oven to 350 degrees. In a large mixing bowl, whisk together flour, almond meal, baking soda. In a smaller bowl, cream applesauce (or butter) and sugar for about two minutes. Stir in egg whites, almond milk and vanilla and almond extracts. Add the wet ingredients to the dry ingredients, stirring together until just combined.

Prepare muffin/cupcake tin with cupcake liners. Fill cups about ¾ full (eyeball it, but beware, they puff up pretty big...I'd err on the side of less). Bake 12-15 minutes, or until golden brown and tops of cupcakes spring back when lightly touched. Remove from oven and let cool completely on a wire rack.

While cupcakes are baking, cream butter and powdered sugar together until creamy. Add almond milk and almond extract and continue to mix until desired frosting consistency is reached.

When cupcakes have completely cooled, use piping equipment to fill cupcakes with raspberry sauce by  placing tip into center of cupcake and carefully squeezing sauce in. Try not to overfill, the sauce will squirt out the top of the cupcake. When cupcakes are filled, frost with a knife or any desired piping tip.

**NOTE: almond meal can be made by grinding almonds in a food processor, blender or coffee grinder (I find this the best use of my coffee grinder and it works better than the other two)

Monday, November 29, 2010

a walk this morning

This post is a tribute to the love of my life. 


I am so completely inspired by this man. 

When Brandon and I first stared dating, I remember sitting on the couch with him while he was in the process of writing "A Walk This Morning" (the song he plays in the video above)... I remember being absolutely perplexed, trying to understand the process that was going on inside his head. 

I'm an engineer. Scientific-minded. Theory-based thinking. Method to solve every problem.

Brandon is an artist. Inspiration, ideas, thoughts, dreams...all these things run through him so differently than they do for me. No wonder they say opposites attract. Ok, we're definitely not opposites...but the way my brain approaches a "problem" (for lack of a better word) is very, very different than his. 

That is an incredible phenomenon to observe.

The day I sat on the couch with him, he thought through which words he wrote would be emphasized on a down-beat and which would not. It took a few tries for him to get comfortable with the song and the newest verse he had written, but he didn't mind much when it didn't come out exactly as he had intended. He just kept moving forward (to quote one of my favorite movies, Meet the Robinsons). It was so different for me to just sit and try to see and feel and understand what was going through him at that moment. 

Different and inspiring.

So, today I just wanted to share with you the work of someone who has inspired me to truly live my life, to stop getting bogged down by methodical approaches to everything, to stop miring myself in routine and just take things as they come...to keep moving forward.   Thank you, Brandon. 


If you guys liked that song, please go check out his website, firesidesymphony.com, where you can listen to some of his other music... OR you can check out FireSide Symphony on Facebook. 


Tuesday, November 23, 2010

Holiday Gift Giving: Herb Infused Olive Oil


Herb infused olive oil?!! YES! I don't know how I came up with that idea (although, I can probably attribute it to dating an artist and wanting to make something for our families this year) but as soon as it crossed my mind, I knew I absolutely had a winner!

It's a great gift idea because you can tailor-make your olive oil to each person's tastes. Personally, I am a big spicy foods girl, I get that from my dad, so my ideal infused olive oil is going to include hot peppers! Anyway, this is really easy to do and makes a really thoughtful gift, in my opinion.


It's super easy too! All you need is some olive oil bottles (I got a bunch of them at World Market, prices ranged from about $3 to $7, depending on the size), some fresh herbs (the heartier, the better: rosemary, thyme, sage, garlic, maybe even some dried hot peppers!!), and olive oil. I went to Sam's Club and got a gallon of it for approximately $13. 

Oh, and you'll also need a funnel if you don't have one. Trust me, you're gonna want this.

Our method was to fill the olive oil bottle about 3/4 full with oil. Make sure you watch the olive oil entering the bottle AND the oil going into the funnel! You can pour oil into our funnel much fast than it comes out, what we ended up with was olive oil all over the kitchen table. After you semi-fill the bottle, insert your herb, pepper or whatever you're filling the bottles with.[11.30.10 edited to add: make sure anything you put into the olive oil bottles is DRIED. We made that mistake and our fresh rosemary was growing something after about a week. We're not trying to make anyone sick with our gifts...so dry dry dry your herbs and peppers and whatever goes into that oil!] I found that using a chopstick was useful in positioning and inserting the herbs. Then, finish filling the bottle with olive oil and cork it!


I'm planning on sending these to my parents in Hawaii...hopefully that plan doesn't backfire on me. We're going to have to devise some creative ways to make sure the bottles get there safely and intact. I thought about just carrying them with us when we go to visit, but we can't carry them on the airplane...and packing them makes me more nervous than just shipping them.

What's your best homemade gift idea (that you've given or received)?? Also, any ideas on successfully shipping olive oil across the country?


Monday, November 22, 2010

Homemade Ravioli


Here's a quick how-to on homemade ravioli. Basically I scoured the internet for instructions and all the recipes out there are generally the same; flour, eggs, salt. I'll also give you the recipe (and by recipe, I mean guidelines) of what we filled our ravi's with...but you can basically put whatever the heck you want in them. Since it was our freekend, we used what we had in the house: cottage cheese, parmesan, tomatoes, herbs, etc. They ended up being delicious! Definitely something I'm planning to do again, mixing it up on the fill-ins. Brandon also said it was just like making perogies with his Grandmother...so if you know how to make perogies, you're already there. Honestly it's not difficult at all, just takes a little time. Definitely worth the work though!

Whole Wheat Basil and Cottage Cheese Ravioli


ingredients:
2 cups whole wheat flour
3 large eggs + 1 for egg wash
1/2 tsp salt
some water, enough to make smooth dough

method:
Whisk together flour and salt. Or hand mix (that's what I did...why would I want to dirty my whisk?)

Add eggs, one at a time, mix into flour by hand to form dough. Add water, if needed, to make a smooth dough, if it gets too sticky, just add more flour. Pretty sure you can add another egg if you wanted to, instead of water.

Knead dough for 10 minutes (ugh! I know. I made Brandon do it for half the time) until elastic and smooth. Wrap the dough ball in plastic wrap and let sit for 20 minutes or so. While you're letting the dough, make your filling.


Flour your work surface and roll the dough out, flipping and flouring as you go, until it is paper thin. The recipes I had recommend starting with a "just larger than a golfball" sized dough ball, but I rolled out the whole thing at once. Breaking it up into smaller pieces may have made sense though. Hindsight. The recipe also said "you will be able to see your hand through the dough when you lift it off the counter. We didn't roll it out that thin...and can you blame us? We were hungry!!!


Use a cookie cutter, or a glass, or you could probably even just cut the dough to shape, fill it with about a teaspoon of the filling you made while letting the dough set. Brush your egg wash (egg glue, if you will) on the outer rim of the dough, fold it in half, with the filling inside and then press the top to the bottom and form a seal. Try not to get air caught inside your ravi's.


Bring a pot of water to a boil and toss your ravioli in the pot for 4-5 minutes. They'll float to the top when they're ready to eat! Toss them in a sauce of your choosing and enjoy!!

Note: if you want to make them in advance or store them for later, freeze them on a baking sheet lined with parchment. Make sure they freeze in one layer, don't stack them. If you have too many ravi's for one baking sheet, you can put down another piece of parchment paper and place the next layer on top.


Basil Cottage Cheese Filling


ingredients:
1.5 cups cottage cheese
1/2 cup parmesan cheese, grated
1/2 cup stewed tomatoes
1/4 cup breadcrumbs
1 clove garlic
basil, to taste
italian seasoning (or oregano, basil, garlic etc.)
pepper to taste

method:
Chop tomatoes and add to a medium mixing bowl with all other ingredients. Adjust herbs and seasonings to taste. Fill your ravioli!!!

What I did this freekend...


The Neverhomemakers, Ashley and Stephen, inspired me on this one...this weekend Brandon and I celebrated our first freekend! A few days to enjoy our time outside of work without spending a cent. Dollars spent easily add up on random things over the weekend...what could we do with the money that we save??? We decided to keep a list of things/prices that we would have bought on our freekends and put that money away and save up for something special. A vacation perhaps???

So far our list looks something like this:
  • 1 gallon olive oil (from Sam's Club...for Chrismukkah gifts!) - $13
  • foot lotion for the puppy - $7
  • iron supplement - $6
  • Christmas Ale - $9 
  • Drinks in Lakewood - $40


For a grand total of...(drumroll, please)...$75!! I honestly don't think this list is very complete, because it was kind of an ex pos facto decision to keep track of things we would have spent....but seventy-five bucks isn't half bad! That's seventy-five dollars towards our next vacay. Thanks, Ashley! I love freekends.

So how did we spend our time? It actually ended up being a ridiculously full weekend, both productive and relaxing. It went something like this:

Friday night
  • yoga with my favorite yoga teacher!
  • grilled pita pizzas for dinner, plus one Christmas Ale
  • Harry Potter and the Goblet of Fire (we're doing a HP recap before we go see the Part 1 of the Deathly Hallows)...falling asleep in front of the TV ensued, we woke up at 2am to move into the bedroom. 
Saturday:

  • Sleep in
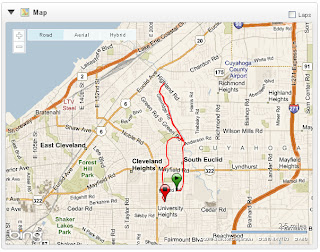
  • 10-ish mile bike ride, to a park I've just discovered 2 miles from our house. We're planning a bike/run/bike on Thanksgiving morning before we head out to Pennsylvania because we had so much fun riding out there!

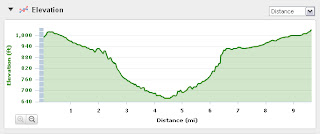
Our ride to Euclid Creek Reservation and back
Yep, big 'ol hill. Love it


  • stop riding to hug a tree and appreciate the beautiful feats of nature that northeast Ohio has to offer

  • take a break from riding to marvel at the graffiti on the Monticello Rd. bridge.


  • muscle up the 2-mile hill (Brandon way ahead of me. That's what I get for trying to take pictures while fighting up a monster hill on my bike.)
  • go watch Brandon's sister dance in a Swing Dance Flash Mob @ the mall in Strongsville. I need to take a second to talk about how AWESOME this is. Its like, random acts of kindness...just a ways to spread joy for no reason at all!
  • Have dinner with Brandon's parents (I guess this technically should disqualify us from our "freekend" but we didn't pay...so I maintain that we're still in.) Bruschetta. Stuffed mushrooms. Veggie fajitas. Christmas Ale. Enough said.
  • watch the more of Harry Potter and the Goblet of Fire and fall asleep on the couch again. Still didn't make it all the way through

Sunday
  • sleep in. We had planned another bike/run workout, but decided to do that later in the week. 
  • turn our leftovers from dinner into a de-freakin-licious brunch. Veggie fajitas-turned-veggie egg scramble with chips crumbled on top!
  • first time for everything: SUNDAY WAS MY FIRST TIME EVER RAKING THE YARD! I started out in a ridiculous get-up because I thought it was cold outside: jeans, longsleeve shirt, hoodie, puffy vest, snow boots, gloves and earmuffs. Temperature: mid-60's. Yep, I shed that clothing pretty quickly. Armed with my rake and a Christmas Ale, I happily spent the afternoon raking our lawn and playing in the leaves!
  • here's another freekend first: homemade ravioli for dinner!!! We made the ravi's while finishing up the rest of Harry Potter and the Goblet of Fire. 
  • ended the night with popcorn (airpopped with HOT SAUCE, salt, cumin and pepper. delish!) and ice cream and Harry Potter and the Order of the Phoenix. We probably made it through half an hour before hopping into bed at 10pm for a solid eight hours of sleep!


What would you do all weekend if you wanted it to be a freekend?? Pick a weekend and...GO! Freekend! How much money do you think you'll save?

Friday, November 19, 2010

I'm a Freegetarian.


 I have been a vegetarian for the past 11 months. Ask me why and I'll tell you "well...it started out because I just got too lazy to cook meat." In exploring my thoughts and feelings on the subject more in depth, and reading many article, blog posts and books...my reasons for not eating meat have shifted.

They shifted the day I watched an episode of Dirty Jobs that was about inseminating turkeys. Aside from inseminating in bulk, instead of letting it happen as nature intended...the whole reason a human had to inseminate the turkeys was because they breed them too big for the turkeys to reproduce naturally! That grossed me out for several reasons:
a) I don't want to be eating genetically modified anything. I have my own capricious hormones to deal with, thank you very much.
b) It's unsettling to me how food science, and the food industry in general, is toying with the delicate balance of life cycles that have existed harmoniously for billions of years.

Alright, let me get off my soap box.

So, I don't eat meat. What do I do when I go to someone's house for dinner though? I have always felt a bit rude asking them to prepare a dish without meat. I don't want to inconvenience them, I don't want to seem disrespectful. Brandon brought up a point that really resonates with me; eating is a way of ingesting karma. By not eating what is being served to me, I'm denying that karma. He says he was taught to always take a "nothankyou" serving. Always try a little bit...it's his way of saying "thanks but no thanks" without denying good karma. Interesting, right?

Brandon also challenged me with another thought (he's so good at that! I'm inspired by him everyday) "ok, so the meat industry is miserable. We're thoroughly unimpressed by it...but if I went out and hunted a turkey for us to eat, would you eat it?" Hmm. Would I? On first impulse, no. I'm a vegetarian right? But that turkey gave its life so it could nourish me. It would be disrespectful of me not to eat it.


[Side note: the other night, we pulled medicine cards. I got the contrary Antelope. Antelope said "if you are cold, kill me and wear my skin to keep warm. If you are hungry, kill me and eat my flesh so you don't starve." The book said that Antelope in the contrary is telling me that a "decision to start now is necessary."]

At the time, I couldn't answer the question of whether I'd eat Brandon's turkey.

So, I've been feeling very wishy-washy on the subject of vegetarianism. Why did I feel weird about making an exception for meat that I know the very source of where it came from? Why do I feel bad requesting meatless dishes at dinner parties?

Today, I read something that put it all in perspective for me. Something that helped me make a decision to act. By act, I mean, to define my values. Decide exactly how I feel about eating a meat-free diet. What I read was an incredibly poignant post by Mark Scarborough over at Real Food Has Curves. When you have the chance, please take a minute to read it. It's beautifully powerful and moving.

Here's where I am: I'm a freegetarian. (Brandon's word...not mine). When it is within my control (control the controllables, right?) I will not eat generic, industrialized, food-sciencetized meat that's pumped chock-full of hormones and chemicals to make it bigger, meatier and more palatable. If I choose to eat meat, I will only eat meat from animals that I know are raised and killed humanely. I want to be in touch with my food source. But I will not impose my beliefs on my friends and my family. If I am in someone else's home and am served meat that is a product of our industrialized food industry, I will eat it with wholehearted gratitude. After all, that animal had to die to feed me too, and my friends went through the trouble to prepare it. I would be denying its karma by not eating it.

Thursday, November 18, 2010

Almond Milk and Almond Hummus Recipe


I'm a huge proponent of anything homemade. I mean, (to steal a quote from Brandon) the Giant Eagle's and Whole Foods of the world didn't exist more than a generation or two ago...people have been thriving on all things homemade for centuries! If they were suddenly gone...what would we do?! I'd make homemade almond milk and homemade hummus, that's what I would do! 

In all seriousness though, I love making things myself because I can control what goes into them. I won't be putting any chemicals, preservatives or other ingredients unpronounceable names into my food! 

Ingredients in a Twinkie (source)
Homemade almond milk and almond hummus are two things that Brandon and I discovered when we did our change-of-seasons, week-long raw foods cleanse (something I want to do again when we transition into the spring again...maybe for two weeks this time???).  I can't begin to explain what an incredible learning experience that week was for us.It was a different way to get to know your bodies, that's for sure. With a little planning, it's definitely a diet that I could sustain for longer than a week. Part of the goal of eating only raw foods was to explore new ways to prepare and eat the foods that we already eat regularly, which is why I still make almond milk just about every week...and almond hummus (using the leftover almond meal from the almond milk) is our new favorite type of hummus. Best of all, you can adjust the texture, flavor and spicyness from here til Sunday. 

Homemade almond milk and almond hummus = love.


How to make almond milk:
  1. Soak about 1 cup of almonds 4-8 hours or overnight. I usually do just over one cup.
  2. Drain and rinse your almonds then place them in a blender, food processor, magic bullet...anything you use to grind/puree/whip/liquefy.
  3. Cover almonds with water and blend them until they turn into liquid-y ground almonds, then add more water and blend for another minute or so. (The flavor of your almond milk depends on your ratio of almonds to water, I normally do just over 1 cup of almonds to three and a half or four cups of water - it's all up to you!)
  4. Strain your milk using a sprout bag, cheesecloth or fine mesh strainer into a bowl, or anything that will hold the amount of liquid that you are straining. 
  5. Voila! Almond milk! It keeps for 3-5 days in the fridge...I've actually experienced some separation between the water and the nut oil after it sitting in the fridge for a while, just give it a shake and you'll remedy that!
...now, what do you do with all that leftover almond meal??? You make almond hummus!!

Raw Almond Hummus Recipe
adapted from The Raw Food Coach

Ingredients:
~1cup almond meal (leftover from almond milk!)
1/2 cup tahini
1 large garlic clove (I generally use several-love me some garlic)
juice of 2 large lemons
sea salt, pepper, parsley and basil to taste

Directions:
  1. Add all ingredients into a blender or food processor, blendy until you've achieved a smooth (hummus-y) consistency. You will probably have to add some water to get everything moving.
  2. Taste test: you might want to add more salt, pepper, herbs, etc. Here's where you can go nuts! I've been known to add a jalapeno or crushed red pepper flakes for some spice. I've also included roasted red peppers once or twice. Maybe some pinenuts??? Get creative!!


What are your favorite homemade things? Is there something you've been dying to try to recreate at home? I'd love more homemade ideas! Please leave me a comment or email me, peaclovebagels [at] gmail [dot] com.

Tuesday, November 16, 2010

A 5-Mile Trail Run: How I'm Maintaining My Fitness Through The Winter


Brandon and I ran in a 5-mile trail race on Saturday morning. 

1) The weather was BEAUTIFUL for a mid-November morning in Northeast Ohio. I couldn't have asked for anything better
2) Trails are much tougher than roads. Never underestimate that fact.

We live in the suburbs on the east side of Cleveland. There is nothing but roads and sidewalks around us. Trails are definitely a new [and FUN!] thing for me. Be that as it may, I started out way too fast for my trail-running abilities and had to slow waaaay down by the end of the race. We still finished admirably at 46:31 (although, I think the course was actually 4.7 miles). That put me at 9th in my age group...which, by the way, I'm in a totally new age group! I just looked up the results and I couldn't find my name, because I was looking in the 20-24 age group. Haha, whoops.

There was definitely a post-race breakfast that included delicious french fries and a trip to Main Street Cupcakes (sorry about the shoddy pictures, next investment will be a better camera)
:


Let's just put it out there: I am planning on running the Cleveland Marathon next May. I say "planning" because in the last year I have signed up for two races I couldn't end up running because of my perpetual shin problems. I ran the Akron Marathon in 2009 and ended up with a tibial stress fracture by the end of training, because I didn't listen to my body. I ran through pain that started as shin splints and ended up sidelining me for months after the marathon. Not cool, Becca.

I just kept training because I wanted to say I did it. I was also scared to start and not be able to finish. So I just kept training. My full mileage.

So when I say I'm planning to run the marathon, I mean I'm going to start training in January, as if I'm going to run in May and play it by ear from there. I will probably try to follow Hal Higdon's Novice training plan, which looks something like this:

Week
Mon
Tue
Wed
Thur
Fri
Sat
Sun
1
rest
3 m run
5 m pace
3 m run
rest
8
cross
2
rest
3 m run
5 m run
3 m run
rest
9
cross
3
rest
3 m run
5 m pace
3 m run
rest
6
cross
4
rest
3 m run
6 m pace
3 m run
rest
11
cross
5
rest
3 m run
6 m run
3 m run
rest
12
cross
6
rest
3 m run
6 m pace
3 m run
rest
9
cross
7
rest
4 m run
7 m pace
4 m run
rest
14
cross
8
rest
4 m run
7 m run
4 m run
rest
15
cross
9
rest
4 m run
7 m pace
4 m run
rest
11
cross
10
rest
4 m run
8 m pace
4 m run
rest
17
cross
11
rest
5 m run
8 m run
5 m run
rest
18
cross
12
rest
5 m run
8 m pace
5 m run
rest
13
cross
13
rest
5 m run
5 m pace
5 m run
rest
19
cross
14
rest
5 m run
8 m run
5 m run
rest
12
cross
15
rest
5 m run
5 m pace
5 m run
rest
20
cross
16
rest
5 m run
4 m pace
5 m run
rest
12
cross
17
rest
4 m run
3 m run
4 m run
rest
8
cross
18
rest
3 m run
2 m run
rest
rest
2 m run
Marathon

With a few tweaks...like doing run/walk training (for me,. run 4 minutes, walk 1 minute for the allotted time) on the Tuesday and Thursday shorter runs. Also maybe adding in a couple of track workouts to change it up a bit. There are no less than 5 colleges within a 5 mile radius of my house, so finding a track to get on, fortunately, isn't difficult for me.

Beginning my training in January means gearing up for marathon-training mileage by January. I'm not talking being able to run 20 miles by then, but right now I am probably averaging 10-12 miles a week. So if I keep that up, I'm going to be risking injury pretty quickly by jumping to 20-30 miles a week right away. Taking my last marathon training debacle into account, I DO NOT want to end up in a boot, unable to run for months again. No thank-you.

How am I going to get there?
1. Start adding on miles now. I hope to be able to run 8-10 miles at a time before I actually start my training. My longest run since my summer half marathons has been 6.4 miles, so I have a little ways to go, but I definitely have time. My goal is to add a bit of mileage to my longer weekend runs between now and January. 
2. Continute run/walk training. When I start the marathon training, I'm going to run 3 minutes, walk 2 minutes for the first couple of weeks, then I'm going to bump it up to run 4/walk 2, then finally run 4/walk 1. You'd be amazed at how good you'll feel when you train this way. It does wonders for injury prevention.
3. Crosstrain, crosstrain, crosstrain! I truly believe a big part of the reason I got injured last time I was in a big training period was because of my lack of crosstraining. Yoga became a huge part of my life when I couldn't run and now I try to find some time to practice a few days every week. Practicing yoga helps keep me grounded, and it helps keep me strong! Yoga and running are very complementary, provided you always listen to what your body is telling you. So, between my continued exploration into all things yoga, and a little core work here and there, hopefully I will have this crosstraining thing covered. Eventually I am going to get myself a used spinning bike and work that into the routine as well!

Have you trained through the winter for a spring race? What gets you out the door in the cold weather? I'd love to hear any advice on this topic!! Leave a comment or shoot me and email peacelovebagels [at] gmail [dot] com.

Saturday, November 13, 2010

No Knead Rosemary Lemon Bread


Holy I just made real bread, Batman. Up until today, I let my bread machine do all the work....and don't get me wrong, I LOVE my bread machine! But today I made real live, delicious, homemade Rosemary-Lemon Bread.

Hang on. Let me rewind a bit. This is my first every post on this blog. Let it be known that on November 13, 2010 Becca posted her very first blog post AND made real homemade bread. Tonight we're have a bunch of people over for a big 'ol pasta dinner (yep, Brandon made DE-FREAKING-LICIOUS homemade sauce...recipe for that one coming soon) and what better side to complement pasta than yummy bread, which we'll probably throw some garlic on and toast up!

Backing up even more, today started with a 5-mile trail race in Monroe Falls (at a later date I'll discuss how I grew up in Cleveland, went to college in New Jersey and ended up in Cleveland). I haven't been running many trails lately so I wasn't quite ready for the rolling hills... South Euclid tends to be pretty flat. Anyway, trail run (46:30 finish! w00t w00t) then we stopped in Hudson and what does that mean? MAIN STREET CUPCAKES!!!


Let's talk about Wedding Day White, Buckeye, Main Street Cupcakes Fluff, Lemon Drop, Champagne and Berries, and Pumpkin Cheesecake. These guys inspire me to try all kinds of ridiculous cupcake flavors on a daily basis. Since I'm mostly just too lazy to make these decadent cupcakes, I just go to the store. They have two locations, nowhere close to me, but SO worth the trip. So we stopped in for some cupcake-y deliciousness and then had brunch. Thank god for breakfast food at noon!


Okay, so back to the bread! I found this recipe on one of the MANY food blogs I follow, but I recently uploaded all of my recipes to google docs (I love everything Google) so I cannot remember where I saw this recipe. If you recognize this recipe as your own, PLEASE let me know...I'm happy to give credit where credit is due! By the by, this is probably less work than putting ingredients into a bread machine, but my bread machine breads often come out very dense, brick-like and crust-less.

No Knead Rosemary Lemon Bread
Ingredients:
2 1/2c unbleached all purpose flour (the recipe recommended staying with white flour. I'm normally a wheat flour girl...but I really wanted perfect bread!)
1/2c wheat flour
1 3/4tsp salt
1/2tsp yeast
2 stalks fresh rosemary
zest of half a lemon

How you make easy, easy bread:

In a large mixing bowl, whisk together flour, salt and yeast.  Add water and mix until a shaggy mixture forms.  Cover bowl with plastic wrap and set aside for 12 - 18 hours.  Overnight works great.  Heat oven to 450 degrees.  When the oven has reached 450 degrees place a cast iron pot with a lid in the oven and heat the pot for 30 minutes.  Meanwhile, pour dough onto a heavily floured surface and shape into a ball.  Cover with plastic wrap and let set while the pot is heating.  Remove hot pot from the oven and drop in the dough.  Cover and return to oven for 30 minutes.  After 30 minutes remove the lid and bake an additional 15 minutes.  Remove bread from oven and place on a cooling rack to cool.


Final product: 


Where do you get your bread; the grocery store or homade? Do you use a bread machine or have a better way to make lazy bread? I can't wait to hear everybody's comments! Bread is an important part of my diet and I HATE all of the additives in store-bought bread.
Newer Posts Home